LPN grouping
Use this transaction to perform the following actions:
-
Group a license plate number (LPN) with another LPN in a stock site
-
Generate stock movements and create a stock change document in Sage X3
Prerequisites
In Sage X3, perform the actions described below.
Functional prerequisites
-
Assignment (GESTCA)
Open: Setup > General parameters > Sequence number definition > Assignment
Check that a sequence number is defined and assigned to the Stock changes document.
How to create an LPN grouping
Open: LPN > LPN grouping
To create an LPN grouping, you must enter information on 3 pages:
- The initial page is used to:
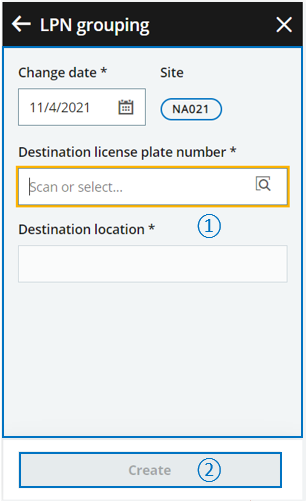
- Set the Change date
- Identify the Destination license plate number code and set the Destination location if the destination license plate number is not linked to a location
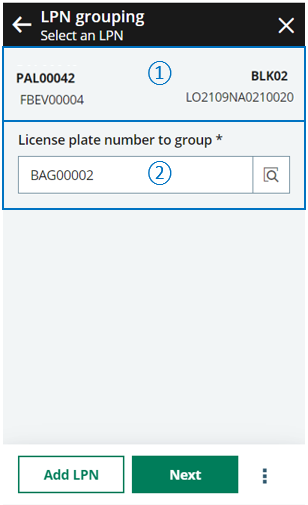
- The second page is used to select the license plate number to group.
-
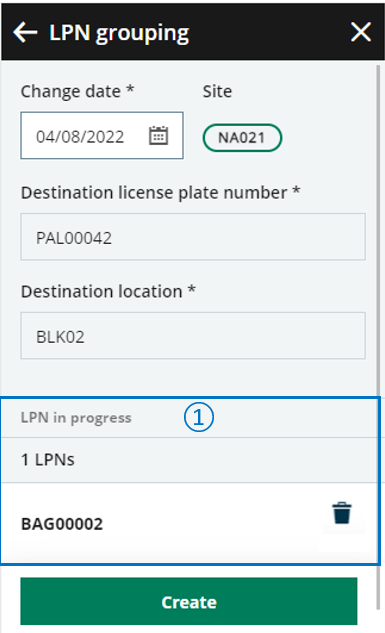
The third page is used to validate the creation of the stock change document and validate the stock movement.
Operating mode
- In the initial page, check that the Change date and Site default values are correct.
-
Scan, select or enter the Destination license plate number and the Destination location if the LPN is not assigned to any location. The Select an LPN page automatically displays.
- Scan or select the license plate number to group.
- To group an additional LPN, tap Add LPN. The Select an LPN page displays again automatically. Repeat step 3. To display the View stock by LPN transaction, tap the More actions icon.
- Tap Next when you are ready to validate the LPN grouping. The initial page displays again automatically. All LPNs in progress are listed at the bottom of the screen.
- To delete a line, tap the delete icon.
- To validate the creation of the stock change document and generate the stock movements, tap Create.
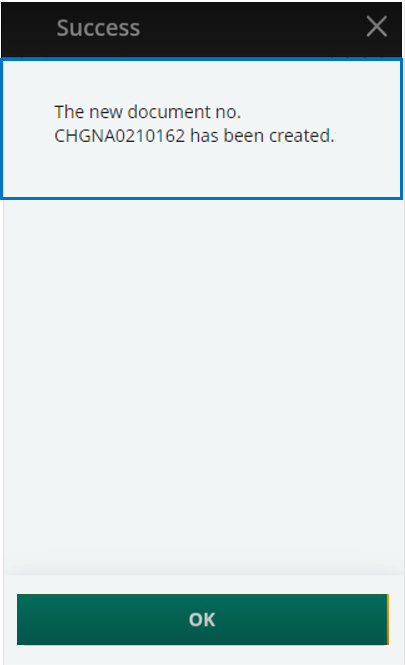
- If you could proceed with the creation, the document number displays. The stock change document and the stock change movements are created.
If you could not proceed with the creation, an error or information message displays.
Tap Go back to display the previous page.
Tap Cancel to delete all the lines.
Step by step
LPN grouping initial page
 |
|
LPN grouping - Select an LPN
Use this page to select the LPN to group.
|

|
The header displays the following information:
|

|
Scan, select or enter the license plate number to group. | |
|
Tap the following actions:
Note - warningAt this stage, the grouping information is saved in the UI only, and not in the database.
|
||

|
|
Create the stock change document and generate stock movements
|
|
The list of LPNs to group in progress displays at the bottom of the page and provides the following information:
You are ready to validate the creation of the stock change document. |
| Before validating the creation, you still have the possibility to delete an LPN grouping: Tap the delete icon. | ||
|
Tap Create when you have completed all the LPN groupings and you are ready to validate the creation of the stock change document and generate the stock movements. |
|
A message displays the generated document number. |
|
|
Note - informationTo access a LPN grouping transaction, CWSLPNG must be authorized.
To create a LPN grouping, GESLPNOPE must be authorized. |
||
| Field | Description | Sage X3 field code | Table (data creation) |
|---|---|---|---|
| Site | Receipt site | STOFCY | SCHGH |
| Change date | Effective date | IPTDAT | SCHGH |
| Destination license plate number | License plate number of destination | LPNNUM | SCHGD |
| Destination location | Location of destination | LOCDES | STOJOU |
| License plate number to group | License plate number to group | LPNNUM | SCHGD |